A heel-to-toe drop looks like a tiny spec, but it can determine where soreness shows up first. Change it too fast, and your calves or Achilles can get cranky, even if the shoe feels great in the store. Drop is just heel height minus forefoot height, but it interacts with your current training load.
This guide keeps it practical: what drop means (and what it does not), how it differs from cushioning, and why photos can fool you. You’ll also get simple ways to sanity-check a drop and track your body’s response for two weeks.
You’ll finish with a drop range that fits your history, mobility, and pacing, plus a transition plan that does not blow up your routine. Start with the 60-second picker, then use the checklists to validate the choice. Ready to pick your drop?
Quick start: pick a drop in 60 seconds
Use this if you want a safe default.
- If you feel good now, buy your next shoe in the same drop, or close to it.
- If calves or Achilles get cranky: consider a higher drop first.If knees or hips get cranky, consider a lower drop first.
- If you want to change the drop, do so slowly, then monitor for two weeks.
Two quick examples:
- Example 1: You often feel tight calves after easy runs. Start with 8 to 12 mm and avoid big drops.
- Example 2: Your knees ache after longer runs. Consider 0 to 6 mm, then watch calves and Achilles during the switch.
The one-minute checklist to run through before you buy
- What drop do you run in now? Look it up, then confirm it feels familiar.
- Where do you get sore first? Calf/Achilles, knee/hip, or foot.
- What’s your weekly volume? Higher mileage needs a slower change.
- Can you afford an adaptation block? If not, stick close to your current drop.
What heel-to-toe drop is and what it is not?
Heel-to-toe drop (also called offset) is the height difference between the heel and the forefoot, measured in millimeters.
- If a shoe has a 32 mm heel and a 24 mm forefoot, the drop is 8 mm.
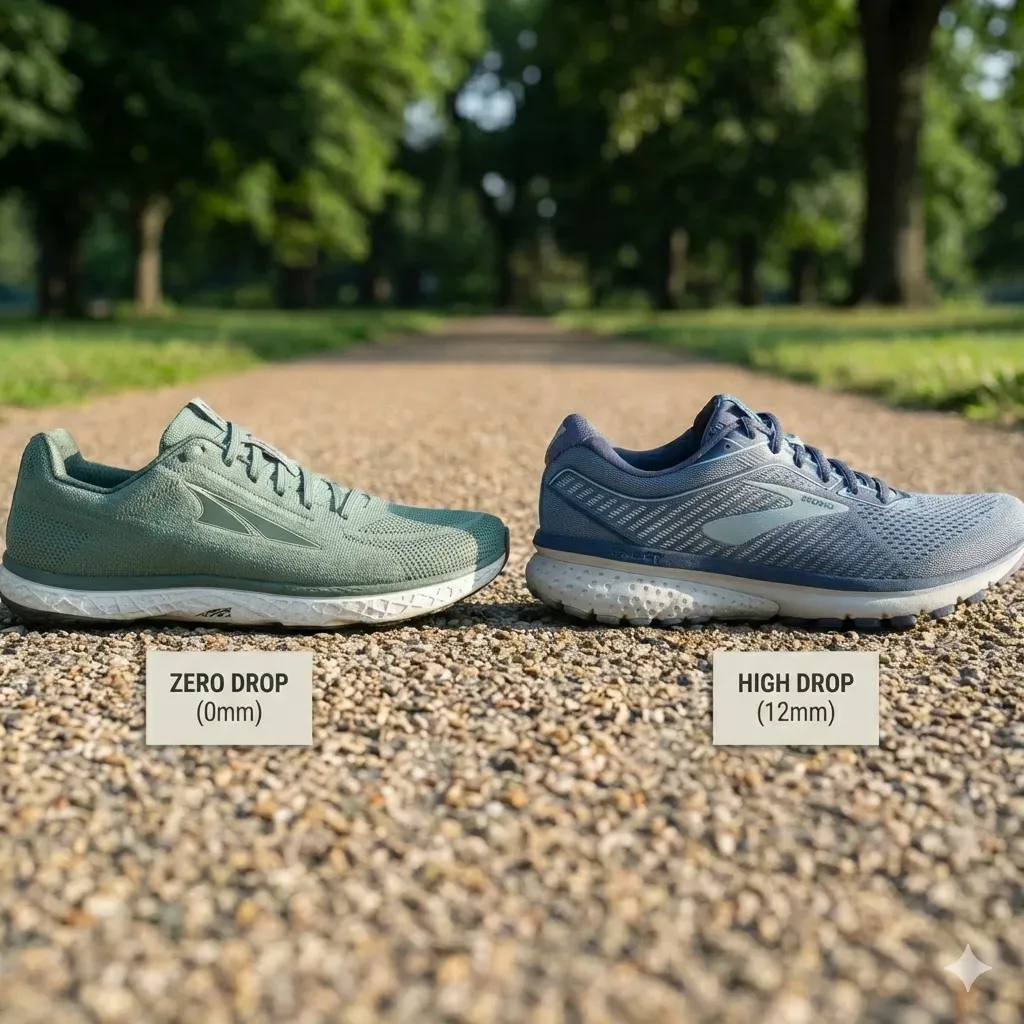
- Drop is a difference, not a total amount of foam.You usually cannot eyeball a drop from the outside. Sidewalls, outsole shapes, and rockers can trick you.
Drop is not cushioning: drop vs stack height
These two get mixed up a lot:
- Stack height: how much material is under your foot, heel, and forefoot.
- Drop: the difference between heel and forefoot stack height.
They are independent. Here’s a simple way to see it.
| Example shoe | Heel stack | Forefoot stack | Drop | What it tells you |
|---|---|---|---|---|
| Shoe A | 40 mm | 36 mm | 4 mm | High cushion, low drop |
| Shoe B | 28 mm | 20 mm | 8 mm | Lower cushion, higher drop |
| Shoe C | 24 mm | 24 mm | 0 mm | Low-to-moderate cushion, zero drop |
A low-drop shoe can still be cushioned. A higher-drop shoe can still be firm.
Why drop can change how running feels?
Drop tends to shift where stress shows up, especially when you change it.
A practical pattern many runners notice:
- Higher drop often feels easier on the foot, ankle, Achilles, and calf.
- Lower drop can increase demand on the calf and Achilles, at least at first.
There is a tradeoff. If one area does less work, another can do more.
One more point: drop can nudge mechanics, but it does not force a new foot strike. Some runners change, many do not.
What to monitor in the first two weeks after any drop change?
Track these after each run and the next morning:
- Calf tightness that builds across runs
- Achilles tenderness, especially in the first steps in the morning
- New forefoot soreness
- New knee ache
- New hip tightness
Use a simple “traffic light” response:
- Green: mild soreness that fades within 24 hours. Keep the effort easy for a week and stay consistent.
- Yellow: soreness that lingers past 24 to 48 hours. Reduce intensity first, then reduce volume.
- Red: sharp pain, limping, swelling, or worsening tendon pain. Stop using the new drop for now and consider a clinician visit.
How to choose the right drop for you?
Drop choice works best as a constraint problem. Start with what your body tolerates.
Use these three inputs:
- Injury history
- Ankle mobility
- Your usual strike pattern and pacing
Then pick a drop range, test it, and monitor for two weeks.
Decision matrix: injury history and where you tend to get pain
Use this table as a starting point, not a rule.
| If you often deal with… | Consider this drop range | Watch-outs for 2 weeks | First adjustment if it flares |
|---|---|---|---|
| Achilles pain, calf strains, calf tightness | 8 to 12 mm | Morning Achilles stiffness, calf soreness after easy runs | Reduce hills and speed work, rotate back to higher drop |
| Knee pain (front of knee), hip soreness | 0 to 6 mm | Calf/Achilles load increases, especially early | Keep runs flat and easy, slow the transition |
| Mixed issues or unsure | 6 to 10 mm | Any new soreness pattern | Change one variable at a time (drop or volume, not both) |
| Returning from injury | Stay near current drop | Any symptom rebound | Shorten runs, keep intensity easy, progress slower |
If you are currently pain-free, comfort and familiarity beat theories.
Decision matrix: ankle mobility and calf stiffness
Lower drop often asks for more ankle bend during stance. Limited mobility can make that feel harsh.
Try this quick screen:
- Face a wall. Place one foot flat on the floor.
- Keep the heel down. Move your knee toward the wall.
- Slide your foot back until your knee can barely touch the wall without the heel lifting.
What to do with the result:
- If you need to be very close to the wall to touch your knee, your ankle bend may be limited.
- If ankle bend feels limited, a big drop decrease can overload calves early.
Support work that often helps during a transition:
- Slow calf raises (straight-knee and bent-knee)
- Short ankle rock drills against a wall
- Walking calf stretches after easy runs
Keep the work light at first. Soreness should not climb week to week.
Decision matrix: your usual foot strike and pacing
Your strike can change with pace, hills, and fatigue. That is normal.
What to do:
- Film for 10 seconds at an easy pace.
- Film 10 seconds at a moderate pace.
Then decide:
- If you land mostly on your heel at an easy pace, a very low drop may feel demanding early.
- If you already land midfoot or forefoot at many paces, drop changes can still matter, but the “feel” shift may be smaller.
Drop is one input. Fit, stability, stiffness, and rocker matter too.
Are brand drop specs accurate?
Sometimes. Sometimes not.
Published drop numbers can be off for normal reasons. That matters most when you are trying to change the drop on purpose.
A practical takeaway:
- Treat the published drop as a ballpark.
- If you are changing a drop, validate it with a sanity check and a short run test.
Why published numbers can be off?
Here are common reasons two sources report different drop values:
- Different measurement points: heel center vs heel edge, forefoot at different locations
- Different sizes: some brands report a sample size that is not yours
- Sockliner and outsole assumptions: one method includes them, another does not
- Compression: foams compress under load; static numbers do not capture that
- Rounding: small rounding changes matter when you are stepping down in small increments
- Also, what you see can mislead you. Sidewalls and rocker shapes can hide the true slope.
At-home sanity check: how to estimate drop without cutting the shoe
This is not lab-grade. It helps you compare two shoes in your hands.
Option 1: Compare “level feel” using a forefoot wedge
- Put on Shoe A. Stand tall with feet hip-width apart.
- Slide a thin book or folded towel under the forefoot only.
- Notice how much wedge it takes before the shoe feels “level.”
- Repeat with Shoe B using the same wedge.
If Shoe A needs more wedge to feel level, it likely has a higher drop feel.
Option 2: Estimate internal heights with a depth gauge, if you have one
Tools: digital calipers with a depth rod, or a depth gauge.
- Remove the insole.
- Place the shoe on a flat table.
- Measure from the table to the footbed at the heel center.
- Measure from the table to the footbed under the ball of the foot.
- Subtract forefoot from heel to estimate drop.
Repeat three times and average. Small errors add up.
Best use: compare two shoes, not chase a perfect number.
When shoe geometry lies: sidewalls and rocker
Two common traps:
- Tall sidewalls: thick foam wrapping up the sides can make the shoe look flatter.
- Aggressive rocker: a curved sole changes how the shoe rolls, even if the drop stays the same.
Buyer checklist when visuals and specs do not match:
- Does the shoe have high sidewalls?
- Does the shoe have a strong rocker?
- Is the outsole thick at the heel edge?
- Does the shoe feel like it “tips” you forward when you jog?
If you are between two drops, trust the short jog test over the side-profile photo.
How to transition to a different drop safely?
Most problems occur when runners change the drop while keeping training the same.
A realistic rule that matches how people buy shoes:
- Either switch directly to the target drop, or
- Use one transition shoe, then move to the target on your next pair
That is it. No long chain of stepping stones.
Direct switch vs one transition shoe
Direct switch is more likely to work when:
- Your drop change is small (about 0 to 4 mm).
- Your calves and Achilles have been calm.
- You can keep most runs easy for 2 to 3 weeks.
One transition shoe is a smarter move when:
- Your drop change is bigger (about 5 mm or more), especially going lower.
- You have a history of Achilles, calf, or plantar issues.
- You are training more days per week and cannot risk a flare.
Pick a transition shoe that makes sense
You do not need a perfect intermediate number. You need “closer than before.”Use this table:
| Current drop | Target drop | Recommended approach | Transition shoe drop (if used) |
|---|---|---|---|
| 10–12 mm | 6–8 mm | Direct is usually fine | Optional |
| 10–12 mm | 0–4 mm | One transition shoe is often smarter | 6–8 mm |
| 8–10 mm | 0–4 mm | Direct can work with a slow ramp | 4–6 mm |
| 6–8 mm | 0 mm | Direct is possible, ramp slowly | 2–4 mm |
| 0–4 mm | 8–12 mm | Direct is usually fine | 6–8 mm if you want caution |
Good news: you may not need to buy the transition shoe at all. Many runners already rotate shoes. If your older pair is your “current drop,” you can ramp the target shoe using that rotation.
Step-down rules and pacing guidance
These rules work for both a direct switch and a one-transition plan:
- Use the new drop on easy, flat runs first.
- Keep workouts, hills, and long runs in the old drop at first.
- If calves or Achilles get sore, reduce intensity, then reduce volume.
- Do not change the drop and ramp weekly mileage at the same time.
A sample ramp plan for a direct switch
This is the most common real-life plan. You buy the target shoe and start rotating it in.
Beginner, 3 runs per week
- Week 1: 1 run in target drop (easy, flat), 2 runs in old drop
- Week 2: 1 to 2 runs in the target drop (easy), the rest of the old drop
- Week 3: 2 runs target drop (easy), 1 run old drop
- Week 4: 2 runs target drop (one can be longer easy), 1 run old drop
- Week 5+: shift most easy runs to target, keep harder running in the old drop until symptoms stay green
Intermediate, 5 runs per week
- Week 1: 2 easy runs, target drop, 3 runs old drop
- Week 2: 2 to 3 easy runs, target drop, workouts old drop
- Week 3: 3 easy runs, target drop, 2 runs old drop
- Week 4: 3 to 4 runs target drop, keep one key workout old drop
- Week 5+: move one faster session to target drop if symptoms stay green
If symptoms hit yellow, hold the week steady or step back.
A sample ramp plan with one transition shoe
This matches how people behave when they want a bridge, not a chain.
- Cycle 1 (transition shoe): follow the direct-switch ramp above, but with the transition shoe as the “target.”
- Cycle 2 (final target shoe): repeat the same ramp when you move from the transition shoe to your final target.
If you had symptoms during Cycle 1, slow down Cycle 2.
Does the drop change as your shoes wear out?
It can, in practice.
If you wear down the heel more than the forefoot, the shoe can seem to have a lower drop over time.
That can change how your calves and Achilles feel, even if the foam still feels soft.
Outsole wear checklist: what to look for in 30 seconds
Take your shoes off and look at the bottom.
- Heel outside edge worn down: common in many runners, can reduce effective drop
- Heel wear uneven left vs right: can change how each leg loads
- Forefoot wear hotspots: can change push-off feel
- Tilt test: place the shoe on a flat table, and check if it rocks or leans
What you might notice on runs:
- A pair feels “lower” or harsher than it did before
- New calf tightness appears with no training change
- One shoe feels different than the other
When wear is a reason to replace or rotate
Rotate or replace when you see this pattern:
- Uneven outsole wear plus a new ache that tracks with that wear
- A clear left-right difference that you can feel while jogging
- Stability feels worse on turns or downhills
If pain sticks around after you change shoes, consider a clinician check. Shoe wear is one factor, not the only one.
Cheat sheet: drop ranges and terms
Drop ranges in plain buckets
These are simple buckets, not rankings.
- Zero drop: 0 mm
- Low drop: 1 to 4 mm
- Medium drop: 5 to 8 mm
- Higher drop: 9 to 12 mm
If you are pain-free, staying close to your current drop is often the easiest path.
Key terms glossary
| Term | What it means | Why it matters |
|---|---|---|
| Drop (offset) | Heel height minus forefoot height | Can shift where stress shows up |
| Stack height | Total height underfoot | Relates to cushioning and protection |
| Rocker | Curved sole shape | Changes how the shoe rolls forward |
| Sidewalls | Foam that rises up the sides | Can change stability and visual slope |
| Outsole wear | Rubber worn down over miles | Can change effective drop and feel |
Shopping reminder
Drop is one number. It helps, but it is not the whole ride.
When you shop, pair drop with:
- Fit and comfort
- Stability needs
- Stack height and firmness
- Rocker feel
- Your current training load
If you want to change drop, treat it like a training change. Go step by step.
FAQs on heel-to-toe drop
What is heel-to-toe drop in a running shoe?
Heel-to-toe drop is the height difference between the heel and the forefoot, measured in millimeters. A shoe with a 32 mm heel and a 24 mm forefoot has an 8 mm drop. Drop is the difference between the heel and the toe, not the total amount of foam under your foot.
Is heel-to-toe drop the same as cushioning or stack height?
No, drop and cushioning are different things. Stack height is how much material sits under your foot, while drop is the difference between heel and forefoot stack. A shoe can be high-cushioned and low-drop (like 40 mm heel, 36 mm forefoot, 4 mm drop), or lower-cushioned and higher-drop.
If I feel good right now, what drop should I buy next?
Stay close to the drop you run in now. That is the simplest way to avoid a surprise load shift when you start using the new pair. If you are curious, start with a small step (about 0 to 4 mm).
Why do my calves or Achilles feel tight when I go to a lower drop?
Lower drop usually asks your ankle to bend more during stance, which can increase calf and Achilles demand early on. That often shows up as calf tightness after easy runs or Achilles tenderness on first steps in the morning. If that happens, keep running flat and easy for a week, then back off speed and hills before you cut mileage.
If my knees ache after long runs, should I try a lower drop?
A lower drop can shift some stress away from the knee for some runners, but it can also raise load on the calves and Achilles. If you try it, pick a modest range (like 0 to 6 mm) and change only one thing at a time. Keep the first two weeks easy and watch for new calf or Achilles symptoms.
How fast can I safely change a shoe drop?
Most runners do best by rotating the new drop into easy, flat runs first, then building from there. A common pattern is one to two easy runs in the new drop in week one, then add another run each week if soreness stays mild and fades within a day. Example: moving from 10 to 12 mm down to 0 to 4 mm often works better with a single transition shoe (e.g., 6 to 8 mm) or a slower ramp.
Are the shoe brand drop numbers accurate?
They are usually close, but they are not perfect. Brands may measure at different points, report different shoe sizes, or round numbers. If you are changing drop on purpose, do a short jog test and trust the feel more than the side profile photo.
When should I stop using the new drop and get help?
Stop the switch if you get sharp pain, limping, swelling, or worsening tendon pain. New Achilles pain, strongest with the first steps in the morning, is a reason to back off quickly. If symptoms do not resolve after you return to your old drop-and-reduce training, consider a clinician visit.
I completed my first 10K on a dare. In a year, I ran a half-marathon. Another year later, I finished a marathon race. Today I run 4 marathons a year and a half-marathon every week. I learned everything about running the hard way. So, I help runners achieve better results easier.